


Golden Cheez-It Chicken Tenders
16/07/2025
Last month, I was desperately trying to figure out what to make for dinner when Emma wandered into the kitchen munching on a box of Cheez-Its. My son was right behind her, already complaining that we never have anything good to eat. You know how kids can be – one minute they love something, the next minute it’s “boring.”
I stared at that bright orange box in Emma’s hands and had one of those lightbulb moments. What if I could turn their favorite snack into dinner? I mean, Cheez-Its are basically the perfect coating – they’re already seasoned, they’re crunchy, and let’s be honest, they taste amazing.
My husband walked in just as I was crushing up a sleeve of crackers with my rolling pin. “What are you doing to those poor Cheez-Its?” he asked, but I could see the curiosity in his eyes. Twenty minutes later, we were all gathered around the table, and you should have seen their faces when they bit into that first tender. Golden, crispy, and packed with that cheesy flavor we all love.
Emma declared it “the best chicken ever,” and my son actually asked if we could have it again the next week. Even my husband, who’s usually skeptical of my kitchen experiments, was reaching for thirds. The best part? It’s so much easier than traditional breading, and the flavor is out of this world.
Now it’s become our go-to comfort food dinner, and I love how something as simple as a box of crackers can turn ordinary chicken into something the whole family gets excited about.
| COOK TIME | TOTAL TIME |
|---|---|
| 20 to 25 minutes | 45 minutes |
Comprehensive Recipe Notes
Make-Ahead Magic
The chicken can marinate overnight for even more flavor, and you can bread the tenders up to 4 hours before baking. The ranch dip is actually better when made a day ahead – the flavors have time to meld together beautifully.
Customization Ideas
Try different Cheez-It flavors, add herbs to the coating, or experiment with different dipping sauces. You can also make this recipe with chicken thighs cut into strips for even more flavor.
Troubleshooting Tips
If your coating isn’t sticking well, make sure the chicken is well-coated in the buttermilk marinade and that you’re pressing the crumbs gently but firmly. If the coating is browning too quickly, lower the oven temperature to 400°F and cook a bit longer.
Storage & Serving
These are best served immediately while the coating is crispy, but leftovers reheat well in the oven. Serve with the ranch dip, some fresh veggies, and maybe some sweet potato fries for a complete meal.
Ingredient Swaps
No chicken tenders? Cut chicken breasts into strips. No buttermilk? Use regular milk with a splash of vinegar. You can even use this technique with fish or pork for variety.
Pro Tips from Nina
Save some whole Cheez-Its to crush and sprinkle on top before baking for extra crunch and visual appeal. Also, don’t crowd the baking sheets – good air circulation is key to getting that perfect crispy coating. And here’s a secret: these are amazing cold in lunchboxes the next day!
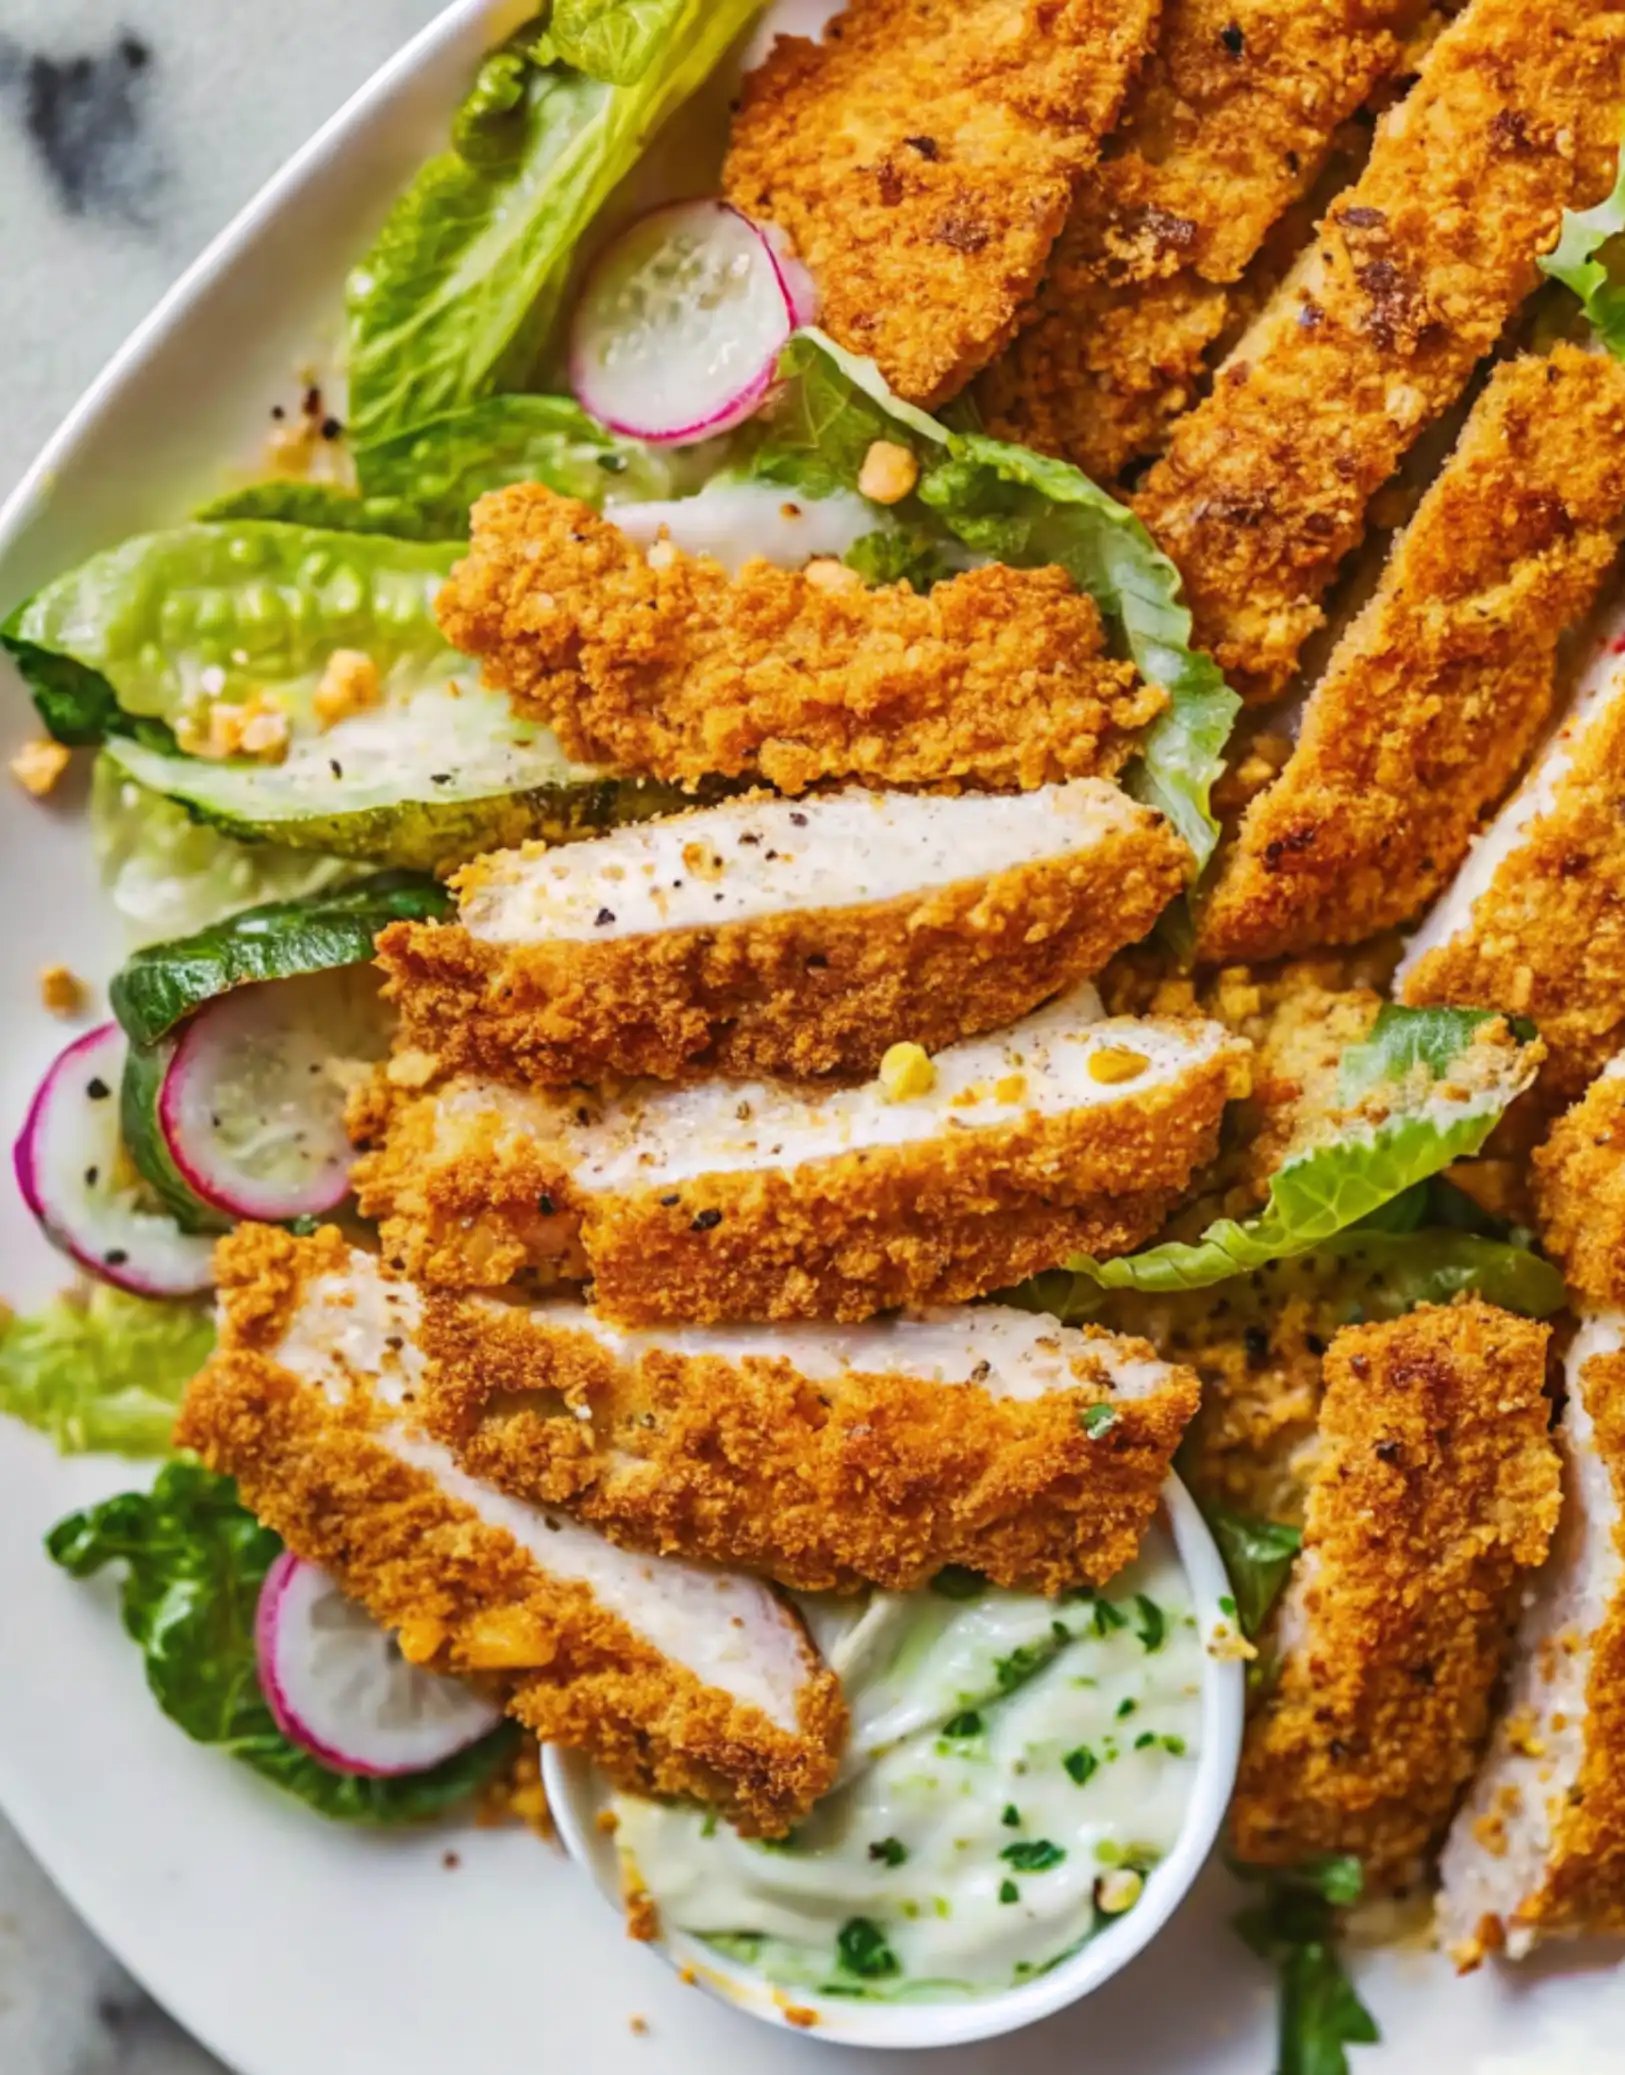
What Are Cheez-It Chicken Tenders?
Cheez-It Chicken Tenders are exactly what they sound like – tender, juicy chicken strips coated in crushed Cheez-It crackers and baked until golden and crispy. It’s a brilliant twist on traditional breaded chicken that adds an incredible cheesy flavor and satisfying crunch that both kids and adults absolutely love.
The concept is simple but genius: instead of using regular breadcrumbs, we crush up those beloved orange crackers to create a coating that’s packed with flavor. The result is chicken tenders that taste like your favorite childhood snack but in the most grown-up, delicious way possible.

Why You’ll Love This
These Golden Cheez-It Chicken Tenders aren’t just dinner – they’re a celebration of creativity, family fun, and that special kind of comfort that comes from food that makes everyone at the table smile. There’s something magical about taking a beloved snack and transforming it into a meal that brings out the kid in all of us.
What I love most about this recipe is how it bridges the gap between “kid food” and “adult food.” The children are thrilled because they get to eat chicken covered in their favorite crackers, while the adults are amazed by how sophisticated and delicious it actually tastes. It’s one of those rare recipes that makes everyone happy.
These tenders represent everything I believe about family cooking – that the best meals are the ones that bring joy, spark conversation, and create memories. When you serve these, you’re not just feeding people; you’re giving them permission to play with their food and remember what it feels like to be delighted by something unexpected.
Key Ingredients in Cheez-It Chicken Tenders
- Cheez-Its (Extra Toasty): The star of the show! These iconic crackers provide that incredible cheesy flavor and golden color. The Extra Toasty variety adds even more depth and richness to the coating.
- Buttermilk: This is the secret to incredibly tender, juicy chicken. The acid in buttermilk helps break down the proteins, creating the most succulent chicken tenders you’ve ever tasted.
- Chicken Tenders: These cook evenly and quickly, making them perfect for this recipe. They’re also naturally tender and kid-friendly in size.
- Garlic Powder: Adds savory depth to both the marinade and the coating, complementing the cheese flavor without overpowering it.
- Hot Sauce: Just a touch adds warmth and helps tenderize the chicken, but it’s mild enough that even sensitive palates will love it.
- Fresh Herbs: The chives and parsley in the ranch dip add brightness and freshness that balances the rich, cheesy coating.
Baked vs. Fried: Which Method Is Best?
I’m a huge fan of baking these chicken tenders, and here’s why: baking gives you that perfect crispy coating without all the mess, oil, and calories of frying. The high heat of the oven creates a beautiful golden crust while keeping the chicken incredibly juicy inside.
Baking is also much more family-friendly – you can cook a large batch at once without standing over a pot of hot oil. Plus, cleanup is so much easier! The cooking spray gives you that golden finish without the need for deep frying.
If you do prefer frying, you absolutely can! Heat oil to 350°F and fry the tenders for about 3-4 minutes per side until golden brown and cooked through. Just be extra careful with the oil temperature and make sure to drain them well on paper towels.
Dipping Sauce Ideas for Cheez-It Chicken Tenders
While the homemade ranch in this recipe is absolutely divine, here are some other delicious dipping options:
- Honey Mustard: Mix equal parts honey and Dijon mustard with a splash of mayo for creaminess.
- Buffalo Ranch: Combine the homemade ranch with a few tablespoons of buffalo wing sauce for a spicy kick.
- Garlic Aioli: Mix mayonnaise with minced garlic, lemon juice, and a pinch of salt.
- Sweet and Sour: Store-bought or homemade, this pairs surprisingly well with the cheesy coating.
- Barbecue Sauce: A classic that never goes out of style, especially good with the Extra Toasty Cheez-Its.
Kitchen Equipment Needed
Essential Tools:
- Large mixing bowl for marinating the chicken
- Food processor or large zip-top bag with rolling pin for crushing crackers
- 2 large baking sheets for even cooking
- Parchment paper to prevent sticking
- Wide bowl or pie plate for breading station
- Small bowl for mixing ranch dip
- Sharp knife for cutting chicken (if using breasts)
- Measuring cups and spoons
Nice-to-Have Tools:
- Kitchen timer to track cooking time
- Tongs for flipping chicken safely
- Instant-read thermometer to check doneness
- Cutting board for prep work
- Clean kitchen towels for cleanup
Nina’s Equipment Notes: Don’t stress if you don’t have a food processor – a rolling pin and a sturdy zip-top bag work perfectly for crushing the Cheez-Its! Just make sure your baking sheets are large enough to give each tender some breathing room. Overcrowding will steam the chicken instead of giving you that beautiful crispy coating we’re after.
Frequently Asked Questions
- Can I make these ahead of time? Yes! You can bread the chicken tenders and refrigerate them for up to 4 hours before baking. This actually helps the coating adhere even better. You can also marinate the chicken overnight for extra flavor.
- What if I don’t have buttermilk? No problem! You can make a substitute by adding 1 tablespoon of lemon juice or white vinegar to 3/4 cup of regular milk. Let it sit for 5 minutes before using.
- Can I use different flavors of Cheez-Its? Absolutely! White Cheddar, Hot & Spicy, or even Pepper Jack Cheez-Its would all be delicious. Each flavor will give your tenders a slightly different personality.
- How do I know when the chicken is done? The chicken should be golden brown and reach an internal temperature of 165°F. If you don’t have a thermometer, cut into the thickest piece – the juices should run clear and the meat should be white throughout.
Kitchen Tips & Tricks
Make sure your Cheez-Its are finely ground but not powdery – you want some texture for that perfect crunch. If your food processor is small, work in batches. Always let excess marinade drip off before breading to prevent soggy coating.
Don’t skip the cooking spray on the parchment paper and the chicken – it’s what gives you that restaurant-quality golden color. If your chicken tenders are different sizes, check the smaller ones first as they’ll cook faster.
Recipe Variations
- Spicy Cheez-It Tenders: Use Hot & Spicy Cheez-Its and add an extra 1/2 teaspoon of hot sauce to the marinade. Serve with cooling ranch or blue cheese dip.
- Parmesan Cheez-It Tenders: Mix 1/2 cup grated Parmesan cheese with the ground Cheez-Its for extra cheesy goodness. Perfect with marinara sauce for dipping.
- Herb-Crusted Cheez-It Tenders: Add 1 teaspoon of dried Italian herbs to the cracker mixture for a more sophisticated flavor profile.
- BBQ Cheez-It Tenders: Add 1 tablespoon of your favorite BBQ seasoning to the cracker mixture and serve with barbecue sauce and coleslaw.
Storage Guide
Store leftover chicken tenders in the refrigerator for up to 3 days in an airtight container. To reheat, place them on a baking sheet and warm in a 350°F oven for 5-10 minutes until heated through and crispy again.
You can freeze the breaded (but unbaked) tenders for up to 3 months. Bake them straight from frozen, adding about 5 extra minutes to the cooking time. Cooked tenders can be frozen for up to 2 months – reheat in the oven for best results.
Don’t Miss More Recipes
Ingredients
Adjust Servings
| 3/4 cup buttermilk creates the most tender, juicy chicken | |
| 2 tsp kosher salt brings out all the flavors | |
| 3 tsp garlic powder divided, adds savory depth | |
| 1 tsp hot sauce such as Cholula, just enough for warmth | |
| 1 1/4 tsp freshly ground black pepper divided, adds perfect seasoning | |
| 2 lbs boneless, skinless chicken tenders or breasts tenders are easiest, but breasts work too | |
| 4 cups Cheez-Its Extra Toasty preferred for maximum flavor | |
| 1 bottle cooking spray for that perfect golden finish |
For the Homemade Ranch Dip
| 2 tbsp fresh chives finely chopped, adds bright flavor | |
| 2 tbsp fresh parsley leaves finely chopped, for color and freshness | |
| 1/2 cup sour cream or plain whole-milk Greek yogurt creamy base that everyone loves | |
| 1/3 cup buttermilk makes it perfectly drizzle-able | |
| 1 tsp garlic powder because garlic makes everything better | |
| 1/2 tsp onion powder adds depth to the ranch flavor | |
| 1/2 tsp kosher salt plus more as needed for perfect seasoning | |
| 1/4 tsp freshly ground black pepper plus more as needed for taste |
Leave a Reply