

9 Essential Knife Skills Every Home Cook Should Master
When I first started cooking seriously, I thought having expensive knives would automatically make me a better cook. Boy, was I wrong! It wasn’t until I discovered a comprehensive knife skills tutorial that everything changed. Watching a professional chef break down these fundamental techniques completely transformed how I approach cooking, and today I want to share these game-changing skills with you.uns
Why Knife Skills Matter More Than You Think
Before diving into the techniques, let me tell you why mastering these skills revolutionized my kitchen experience. Good knife skills aren’t just about looking professional – they actually improve your cooking in three crucial ways:
Safety First: Proper technique dramatically reduces your risk of injury. A confident, controlled cut is always safer than hesitant chopping.
Even Cooking: When ingredients are cut uniformly, they cook at the same rate. No more overcooked edges with raw centers!
Less Waste: Precision cuts help you use more of each ingredient, saving money and reducing food waste.
The Foundation: Proper Knife Holding and Stance
The Handshake Grip
The most important lesson I learned was how to properly hold a chef’s knife. Use what’s called the “handshake grip” – imagine you’re shaking hands with your knife. Wrap your fingers around the handle and grip the spine of the blade. Avoid the common mistake of extending your index finger along the blade – this will tire you out quickly and increase injury risk.
The Claw Technique
Your non-cutting hand is equally important. Form a “claw” with your fingers tucked under, knuckles forward. The knife should rest against your longest knuckle as you cut. This technique protects your fingertips while giving you control over what you’re cutting.
Proper Stance
Stand with your shoulders squared to the cutting board, knees slightly bent. Keep your spine straight – avoid the “hunched over” posture that leads to back pain and poor control.
The 9 Essential Cuts That Changed My Cooking
1. The Rough Chop
When to use it: Perfect for ingredients going into long-cooking dishes like soups and stews.
Technique: Use a high chopping motion for larger pieces, transitioning to a rocking motion for finer cuts. Remember: the longer the cooking time, the larger you can cut your ingredients.
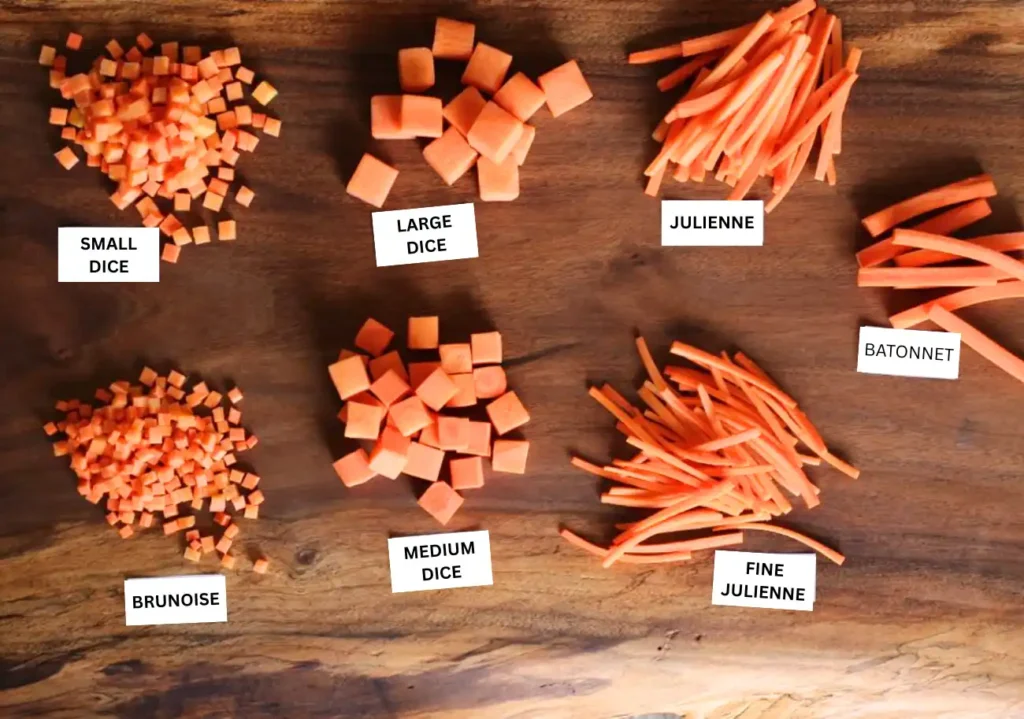
2. The Dice
When to use it: When presentation matters and you want uniform cubes.
My tip: Always start with a flat surface for safety. Cut your ingredient into slabs first, then into sticks, then into perfect cubes. Save any irregular pieces for stocks or rough chops – waste nothing!
3. The Slice
When to use it: For garnishes, sandwiches, and salads.
Technique: Use a gentle sawing motion rather than pressing straight down. This creates clean, even slices without crushing delicate items like tomatoes.
4. The Baton
When to use it: Ideal for crudité platters and uniform cooking pieces.
What I learned: These matchstick-shaped cuts aren’t just pretty – they cook evenly and look professional on any plate.
5. The Julienne
When to use it: Perfect for garnishes and quick-cooking dishes.
Key insight: This fine matchstick cut requires patience but creates restaurant-quality presentation. The uniform thin strips cook quickly and evenly.
6. The Bias Cut
When to use it: Great for green onions as garnish and root vegetables for even cooking.
Angle tip: Aim for 20-45 degrees. This cut increases surface area, helping ingredients cook more evenly while looking sophisticated.
7. The Mince
When to use it: Essential for garlic, herbs, and aromatics.
Game-changer technique: Use the flat side of your knife to crush garlic first – the skin comes off easily! Then use a rocking motion to mince finely.
8. The Chiffonade
When to use it: Perfect for fresh herb garnishes.
Professional secret: Stack your herb leaves, roll them tightly, then slice with a sharp knife. This prevents bruising and creates beautiful, delicate ribbons.
9. The Oblique (Roll) Cut
When to use it: Ideal for irregularly shaped vegetables like carrots.
Why it works: By rolling the vegetable between cuts, you create uniform pieces from tapered ingredients. Everything cooks evenly!
Learn more
The Equipment Truth: Sharp Knives Are Safer Knives
One of the biggest revelations from my knife skills journey was learning that dull knives are actually more dangerous than sharp ones. A dull knife requires more pressure and is more likely to slip. Invest in a good honing steel and use it every 10 minutes while cutting.
Practice Makes Perfect
I won’t lie – these skills took time to develop. I started by practicing these cuts on inexpensive vegetables like onions and potatoes. Each technique became more natural with repetition, and now I can prep ingredients faster and more safely than ever before.
Safety Alert: What NOT to Do
I have to share this important safety reminder: never cut with your hand positioned over your ingredient where you can’t see the blade. Always maintain visual contact with your knife and use the claw grip. Your fingers will thank you!
How These Skills Transformed My Cooking
Learning proper knife skills changed everything about how I cook. My prep time decreased significantly, my dishes look more professional, and I feel confident tackling any recipe. When you can quickly and safely prepare ingredients, cooking becomes more enjoyable and less stressful.
The investment in learning these techniques pays dividends every single time you step into the kitchen. Whether you’re preparing a quick weeknight dinner or an elaborate holiday feast, these fundamental skills will serve you well.
Your Turn to Practice
Start with one technique at a time. Master the basic grip and stance, then work through each cut systematically. Remember, even professional chefs started as beginners – the key is consistent practice and patience with yourself.
What knife skill are you most excited to master? Let me know in the comments below, and don’t forget to share your practice photos on social media – I love seeing your culinary journeys!